Async Flow Control using Queues in Practise for Web Applications
Leveraging Queue Based Load Levelling to build resilient and scalable web applications

Have you ever designed a notification system that leverages services like WhatsApp?
For instance, you might be building a transactional notification system that sends out WhatsApp messages to a set of users based on events that occur in your app. So, you likely integrate the Twillio WhatsApp API and build the notification system, and you’re sending around 30 messages per minute at low loads.
But, what you may fail to consider here is the fact that there is a limit of messages to which WhatsApp can handle. Currently, WhatsApp lets you send a maximum of 50 messages per minute. This means that if your system is under peak load, it might send more than 50 messages per minute, and as a result, the WhatsApp API will start returning 429 errors, indicating that the rate has been exceeded.
But, this isn’t problematic. I can use a backoff mechanism and execute this again.
You’re right. But that would mean you’re creating additional overhead to maintain this backoff algorithm. Plus, you would have to handle events of concurrent executions and use the backoff globally. This is rather complex to manage and is quite tedious.
Therefore, Queue Based Load Levelling has been used as the industry standard on flow control in web apps.
What is Queue Based Load Levelling?
Now, to fix the issue addressed above, you’d need to refactor your solution to let your system do the following:
- The system can submit an infinite number of messages per second that should be sent to WhatsApp.
- The system should accept these infinite messages and process it in an ordered fashion and must send it to WhatsApp by considering the limits.
Ideally, you would need asynchronous, where the client fires and forget its message submission while letting the system take its own time to submit the message onto WhatsApp.

Figure: Asynchronous flow control using message queues in AWS
As shown above, your system has an irregular flow of events (message submission requests), but WhatsApp (Worker Node) requires a stream of 50 messages per minute. So the SQS (Simple Queue Service) Queue sits in between the App and Worker Node and will handle the flow.
Simply put, this is known as Queue Based Load Levelling (Asynchronous Flow Control).
When Should I Use Asynchronous Flow Control?
Now, based on the understanding that we have, it’s important to ensure that you know when you should use this pattern. So, it’s important to consider the following:
- Your application has an irregular flow of events, while your consumer requires a fixed stream of events.
- If the consumer takes a long time to process and you don’t want to keep an HTTP connection open for the client.
- If your client is okay in getting a delayed response. Since queues process the messages in an timed nature, there can be cases where messages take time to get processed by the consumer. So, this can cause delayed responses. If your system can accept a delayed response, go for a queue.
- If your application is subject to linear scaling, consider breaking it down using a queue.
How To Implement Asynchronous Flow Control?
Now’s the important part. How do you implement Asynchronous Flow Control?
For demonstration purposes, I’ll be leveraging AWS Serverless Servies:
- Amazon SQS — This is a serverless messaging queue offered by AWS.
- AWS Lambda — We will leverage a simple Lambda function to process messages that are in the queue.
I’ll build this architectural pattern using Infrastructure as Code with Pulumi.
If you’d like to dive directly into the code, checkout my GitHub repository.
The Problem — Linear Scaling
Consider the following architectural diagram:
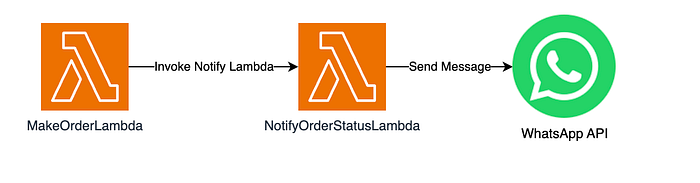
Figure: The Problematic Architecture
The architecture depicts two Lambda functions:
- MakeOrder
- NotifyOrderStatus
Whenever an order is placed, it will send a message to NotifyOrderStatus lambda with the new status. This function will notify the status change to a list of users using the WhatsApp API.
Currently, this depicts a linearly scalable architecture. If MakeOrder is invoked 1000 times per second, NotifyOrderStatus is consequently invoked 1000 times per second as each request comes through in a linear fashion. Ultimately, this invokes the WhatsApp API 1000 times per second, which can cause the operation to fail more than 50% of the time.
The Solution — Using Async Flow Control
Therefore, to fix this problem, let’s refactor this process to use an async flow that can be controlled using a queue, as shown below:
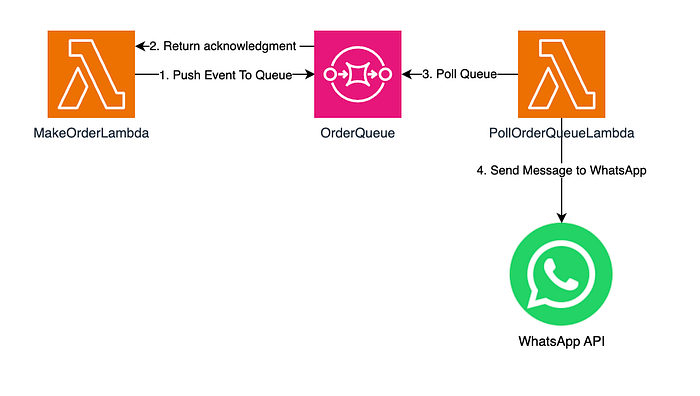
Figure: An improve asynchronous architecture
As you can see above, we’ve introduced a queue — OrderQueue. This will decouple the notification process to the actual order creation.
- When an order is created, it will push the created event to the queue.
- The queue will give an acknowledgement saying the message was accepted and will return a response.
- This will terminate the communication with the client.
- Next, the OrderQueue will start processing the events at its own pace. You can leverage principles like Message Delays to implement this.
- The queue will be polled by another Lambda at a defined interval and will use the WhatsApp API to communicate the order event.
As explained, this completely decouples the two processes and treats it as an independent operation. By doing so, you let your scale scale as necessary and ensure that all messages are delivered.
Fun fact, I ran into a similar issue while I implemented Slack. Slack has a rate limit of sending 1 message per second.
Now, my system generated events at a rate of around 6 per second. I first designed this without a queue, and my messages ended up becoming rejected by Slack due to rate limit issues.
I re-architected this to use a queue with a message delay of 1 second. This meant that only 1 message was processed per second. After doing this, the system worked with no errors!
Let’s Code It Out
Okay, enough talking. Let’s build this solution!
Step 01: Pre-requisites
First things first, it’s important you have the following:
- A working AWS account
- A Pulumi account
- Node.js
- A configured AWS CLI with an IAM User with Administrator Permission.
To verify your installation, run the command aws sts get-caller-identity. If everything's set up, you should see an output similar to the one I've shown below:
{

    "UserId": "XXX",
    "Account": "XXX",
    "Arn": "arn:aws:iam::XXX:user/XXX"
}
After you’ve configured the following, you can start building the app with me!
Step 02: Creating the Pulumi Project
Next, let’s bootstrap a simple Pulumi project using the command:
pulumi new aws-typescriptWhen you initialize your project, ensure to provide the default parameters:

Figure: Setting up the Pulumi Project
After you’ve setup your Pulumi project, let’s provision the infrastructure needed to implement async flow control. To do so, we’ll be provisioning the following:
- SQS Queue — A queue that handles flow control
- A message sender — A Lambda function that pushes events to the queue in an irregular flow.
- A message consumer — A service that processes events from the Queue in a regular flow.
Step 03: Provisioning the Queue
First things first, let’s provision the message queue using Amazon SQS. To do so, open your index.ts file and add the snippet below:
import * as pulumi from "@pulumi/pulumi";
import * as aws from "@pulumi/aws";
import * as awsx from "@pulumi/awsx";

const queue = new aws.sqs.Queue("message-queue", {
  delaySeconds: 10, // 10 second message delay
  messageRetentionSeconds: 1209600, // 14 days
  sqsManagedSseEnabled: true,
  visibilityTimeoutSeconds: 30,
});
The snippet above will provision a Queue with the following properties:
- Delay Seconds — 10. This means that all the messages in the queue will be handed to the consumer at a 10 second delay. This means that consumer of the queue will receive a message from the queue every 10 seconds. You can adjust this parameter based on your requirements.
- Message Retention of 14 days: This means that unprocessed messages in the queue will be available in the queue for 14 days.
- Visibility timeout of 30 seconds: This is the property that lets us control the time that other consumers cannot process the same message. In our example, once a queue sends a message for processing, no other consumer can process it for the next 30 seconds. However, if the message is unprocessed after 30 seconds, other consumers can start processing it. So, we need to configure this value by analyzing the time it takes for an event to process.
Step 04: Defining the Lambda Functions
Next, let’s create two Lambda functions:
- sendMessageToQueueFunction: This function will be responsible on sending events to the queue.
- processQueueFunction: This function will be responsible on processing events sent from the queue.
Update your index.ts with the newly added code:
const sendMessageToQueueFunction = new aws.lambda.CallbackFunction(
  "sendMessageToQueueFunction",
  {
    memorySize: 2024,
    timeout: 200,
    callback: async () => {
      const sqs = new AWS_SDK.SQS({ region: "us-east-1" });
      const queueUrl = queue.id.get();

      // Simulate an irregular load by sending about 100 events with random delays
      for (let i = 0; i < 100; i++) {
        // Introduce a random delay (between 1 and 10 seconds) before sending each event
        const delaySeconds = Math.floor(Math.random() * 10) + 1;
        await new Promise((resolve) =>
          setTimeout(resolve, delaySeconds * 1000)
        );

        // Send a message to the SQS queue
        await sqs
          .sendMessage({ QueueUrl: queueUrl, MessageBody: `Event ${i + 1}` })
          .promise();
      }
    },
  }
);


const processQueueFunction = new aws.lambda.CallbackFunction(
  "processQueueFunction",
  {
    callback: async (event: aws.sqs.QueueEvent) => {
      await Promise.all(
        event.Records.map(async (record) => {
          console.log(JSON.stringify({ record }));

          const sqs = new AWS_SDK.SQS({ region: "us-east-1" });
          await sqs
            .deleteMessage({
              QueueUrl: queue.url.get(),
              ReceiptHandle: record.receiptHandle,
            })
            .promise();
        })
      );
    },
    memorySize: 2400,
    timeout: 30,
  }
);
The Lambda functions defined above will create the two Lambda functions that will be used to demonstrate the async flow control. As you can see, the function — sendMessageToQueueFunction showcases a step where it simulates a highly irregular workload with the use of the loop and then timeout.
The function — processQueueFunction handles the events sent from the queue and outputs the event that it received. Hereafter, it deletes the message from the queue to prevent other messages from consuming it.
Next, we will have to create an integration between our components to ensure that the processQueueFunction can poll for messages from the SQS Queue. To do so, we will have to create an event subscription. This can be done using the snippet:
queue.onEvent("onPush", processQueueFunction);By doing so, Pulumi will automatically provision the subscription and will set up the relevant IAM Role and Permission necessary for polling.
Step 05: Deploying the Infrastructure
Next, we can deploy the infrastructure to the AWS Cloud to being testing it. To do so, run the command:
pulumi upThis will generate a summary on all the infrastructure that Pulumi will provision in our AWS Account.
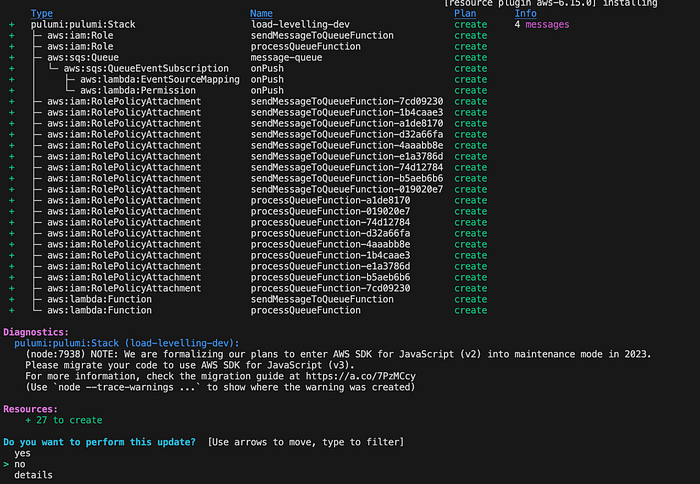
Figure: Viewing Infrastructure changes
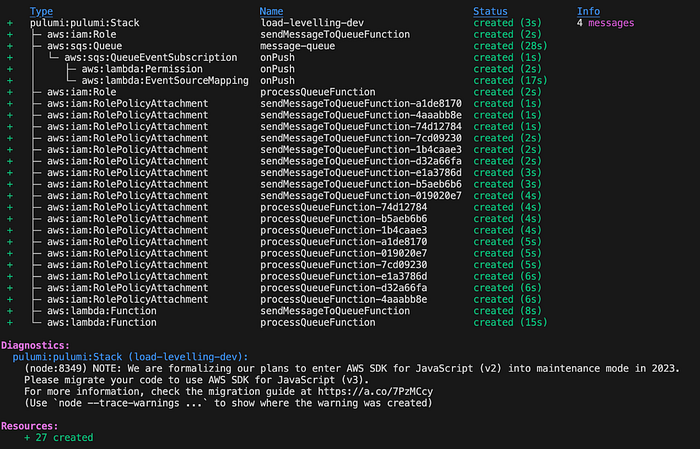
After you’ve viewed the changes, confirm it by selecting “YES” and it will deploy the infrastructure on your AWS Cloud. After deployment, you should see the output:
Step 06: Testing the Infrastructure
Upon deployment, head over to the AWS Lambda console and create a function URL of the function — sendToQueueFunction.
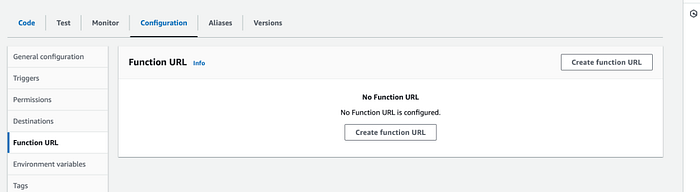
Figure — Creating a Function URL
Let’s use the function URL to invoke the Lambda function to send messages to the queue. Once you invoke your Lambda function, you should see the output shown below in your processQueueFunction:
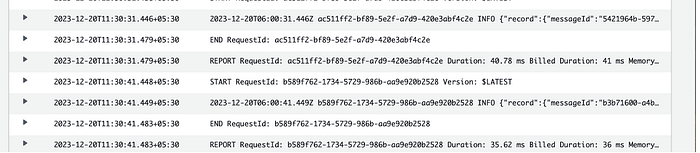
Figure: Processing the events in the queue handler
As you can see, the events are processed every 10 seconds. This showcases that the flow is being controlled through the SQS Queue. By doing so, you can now set this up to an SNS topic to immediately push messages to SNS topics at 10 second intervals or use this Lambda function to send your notifications to WhatsApp!
Either way, you’ve got yourself an async flow-controlled architecture set up and ready for action!
Wrapping Up
Async flow control is important in building decoupled and high scalable, performing systems. By implementing this pattern, you cut out linear scaling and let your system components scale at their own pace and keep up with the ever changing demands of the end user.
To view the full code for this app, explore my GitHub repository.
I hope you found this article helpful.
Thank you for reading!