Build a Webcam Communication App using WebRTC

WebRTC is a protocol that allows you to create real-time communication between peers using JavaScript.
We can use this technology to make it possible for 2 (or more) browsers to directly talk to each other, without needing a central server that would only become a bottleneck.
The server is only needed before the connection happens, so that every client knows how to communicate to each other.
What kind of applications does this unlock? Direct webcam connections, for example. Peer to peer chats, file sharing, and much more.
In this tutorial I want to make what’s probably the application that gives the most “wow” effect when you first run it: a webcam communication app.
We’re not going to use the raw WebRTC API, however: it’s rather low level and there are a lot of things we need to take care to make it work correctly, and handling the tiny details would make this app a bit too long and error-prone process. This is what libraries are for: they give us a nice layer of abstraction so that we can focus on creating an application rather than battling with a lower level API.
One of those libraries is PeerJS, which makes real time communication extremely simple. Under the hood it’s just WebRTC, and its abstraction is a great way to get the result quickly, so you can go and check out how the internals work later on.
Tip: Make JavaScript components reusable with Bit. Then, share your collection with your team and build new apps faster with components.
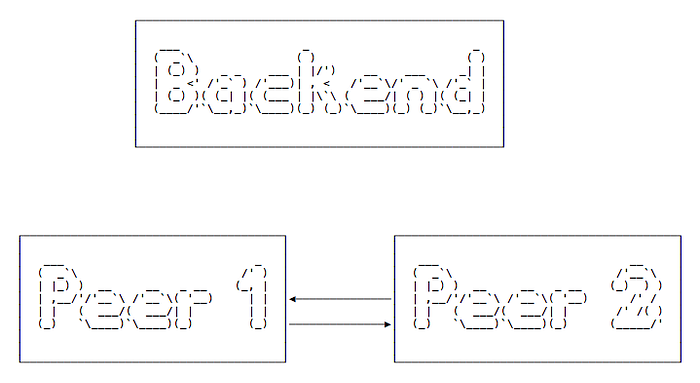
The backend
The first thing we’ll do to work with WebRTC is to create a backend. While it’s true that we’ll perform a direct peer to peer communication, the initial handshake and coordination needed to perform it needs a centralized server.

Once the initial handshake is complete, the peers will communicate with each other without involving the backend:
PeerJS created one for us which you can self-host, and it’s really easy to install and run.
In a folder, initialize an npm project using npm init, install PeerJS using npm install peer and then and you can run it using npx:
npx peerjs --port 9000(run npx peerjs --help to see all the options you can use).
This is your backend 🙂
Now we can create the simplest application that does anything useful. We have one receiver and one sender.
The frontend
First we create the receiver, which connects to our PeerJS server, and listens for data coming in to it. The first parameter to new Peer() is our peer name, which we call receiver to make it clear:
Include the PeerJS client:
<script src="https://cdnjs.cloudflare.com/ajax/libs/peerjs/0.3.16/peer.min.js"></script>Then we initialize the Peer object. The connection event is called when another peer connects to us. When we receive some data, the data event is called with the payload:
const peer = new Peer('receiver', { host: 'localhost', port: 9000, path: '/' })peer.on('connection', (conn) => {
  conn.on('data', (data) => {
    console.log(data);
  })
})
Let’s create the other end of the communication. We’ll call this sender because it’s the one that will connect and send a message to the receiver.
We initialize the Peer object, then we ask the peer to connect to the receiver peer, which we registered earlier. Then once the connection is established the open event fires, and we can call the send() method on the connection to send data to the other end:
const peer = new Peer('sender', { host: 'localhost', port: 9000, path: '/' })const conn = peer.connect('receiver')conn.on('open', () => {
  conn.send('hi!')
})
That is the most basic example you can make.
First you open the receiver page, then you open the sender page. The receiver gets the message directly from the sender, not from a centralized resource. The server part is only needed to exchange information so the 2 parts can connect. After that, it’s not interfering any more.
This was a very basic data connection.
Let’s go to the next step, and instead of just sending a message, let’s get our peers to share their webcams streams with each other.
On the client instead of connecting to a peer with peer.connect(), we’ll call peer.call():
const call = peer.call('receiver', localStream)
})
On the receiver end, we must answer the call when we have a call event callback:
peer.on('call', call => {
  call.answer(localStream)
})
Think like a telephone communication, we don’t automatically reply to every call, but we must answer explicitly.
What is localStream, in each of the calls? It’s the stream from our webcam, and we must explicitly get it by calling navigator.mediaDevices.getUserMedia(), a browser API.
It’s an asynchronous call, so we’ll use async/await to wait for its execution. We need to wrap the call in an async function, first:
const startChat = async () => {
  const localStream = await navigator.mediaDevices.getUserMedia({
    video: true
  })
}startChat()
Once we have the localStream object, we can assign it to a video element in our HTML page. As we’re here, we can create a local and a remote video elements, so we can see ourselves, and we can see the remote peer:
<video id="local" autoplay></video>
<video id="remote" autoplay></video>
We assign the stream to the video#local element:
document.querySelector('video#local').srcObject = localStreamNext, we call the receiver peer, passing the localStream object:
const call = peer.call('receiver', localStream)The code of the receiver endpoint now is this:
peer.on('call', call => {
  call.answer(localStream)
})
we must get the media stream here as well. The code is very similar to the sender code, except we can wrap all in the call event callback:
peer.on('call', call => {
  const startChat = async () => {
    const localStream = await navigator.mediaDevices.getUserMedia({
      video: true
    })
    document.querySelector('video#local').srcObject = localStream
    call.answer(localStream)
  }  startChat()
})
Show the remote stream
We have one last piece we need to add, to both the sender and receiver.
We need to attach the remote stream to the video#remote element, as soon as we get it from the stream event on the call object:
call.on('stream', remoteStream => {
  document.querySelector('video#remote').srcObject = remoteStream
})
Our full receiver code is:
peer.on('call', call => {
  const startChat = async () => {
    const localStream = await navigator.mediaDevices.getUserMedia({
      video: true
    })
    document.querySelector('video#local').srcObject = localStream
    call.answer(localStream)    call.on('stream', remoteStream => {
      document.querySelector('video#remote').srcObject = remoteStream
    })
  }  startChat()
})
And the full sender code is:
const startChat = async () => {
  const localStream = await navigator.mediaDevices.getUserMedia({
    video: true
  })
  document.querySelector('video#local').srcObject = localStream
  const call = peer.call('receiver', localStream)  call.on('stream', remoteStream => {
    document.querySelector('video#remote').srcObject = remoteStream
  })
}startChat()
When one end closes the connection by navigating to a new page or by closing the browser tab, the other end stops receiving the stream and the remote video streaming stops.
Tip: you need to serve those files from an HTTP server, you can’t load them from the filesystem while testing. Chrome requires you to serve those files on HTTPS (or from localhost) in order to access the media devices capabilities we need to access the webcam.
Conclusion
We made a very simple peer-to-peer webcam communication using WebRTC. In this example we created two separate files to handle the two sides the communication, but it’s not necessary. You can create a user interface that lets the users decide if they want to call, and more importantly who they want to call, by letting them enter a username or choose from a list, which can be sourced by the centralized server.