Build a React Native App with Expo
A summary of the steps I took to go from concept to a published app in two weeks, using React Native as my framework and Expo as my interface.
Following these steps, you’ll quickly have an app that runs on iOS and Android and which includes in-app analytics.
The game
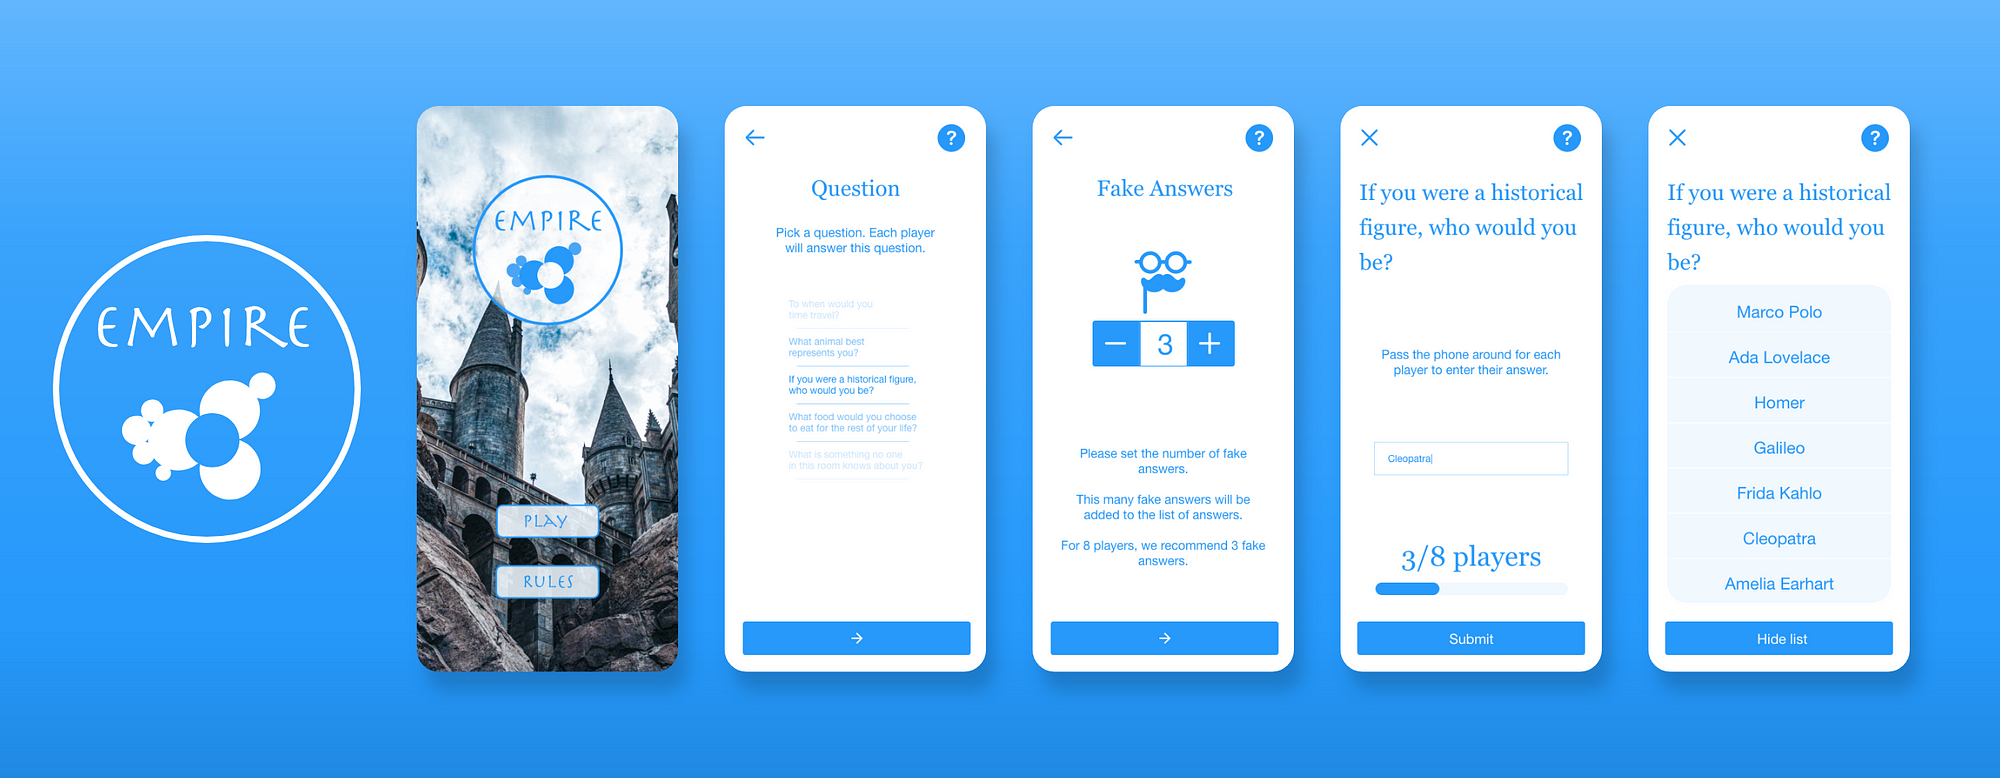
The app I built facilitates a party game called Empire, in which players answer a question and then guess which players provided which answers. Empire is my go-to game for large groups because it is easy to learn and works well with any number of players.
The downside is that someone has to sit out during the game to collect all the answers and make up fake answers. I had been wanting to create an app with React Native for a while, and this seemed like a great use for an app.
My process
I’ll break my process down into four steps:
- Spec out features
- Design visuals
- Code app
- Submit to Apple App Store and Google Play
Spec features
Easily overlooked, spec’ing out your app will allow you to move fast through the rest of the steps. I recommend pretending you’re a project manager at a large company and writing out all the details you can think of. This took me five to ten minutes and illuminated some key features of the design and the code that I would not have thought of otherwise.
Make sure you’re spec’ing (and developing) the simplest version of your app you can. Don’t fail to create an app because you’re creating features that seem simple but aren’t essential to your app — start with your MVP.
If you want to take this step even further, check out articles like this one and this one.
Design visuals
Taking this step seriously will also let you move much more quickly when coding your app. If you can refer back to a concrete design, you’ll be able to 1) know exactly what you should be creating and 2) take CSS parameters straight from the design. Figuring out how your app should look by writing code is a waste of time compared to designing visuals in a dedicated design tool.
There are many good design tools out there, the big three options currently being Figma, Sketch, and Adobe XD. You can read about the differences here. I used XD (because it came with a Creative Cloud subscription that I happened to have) and was very happy with my experience.
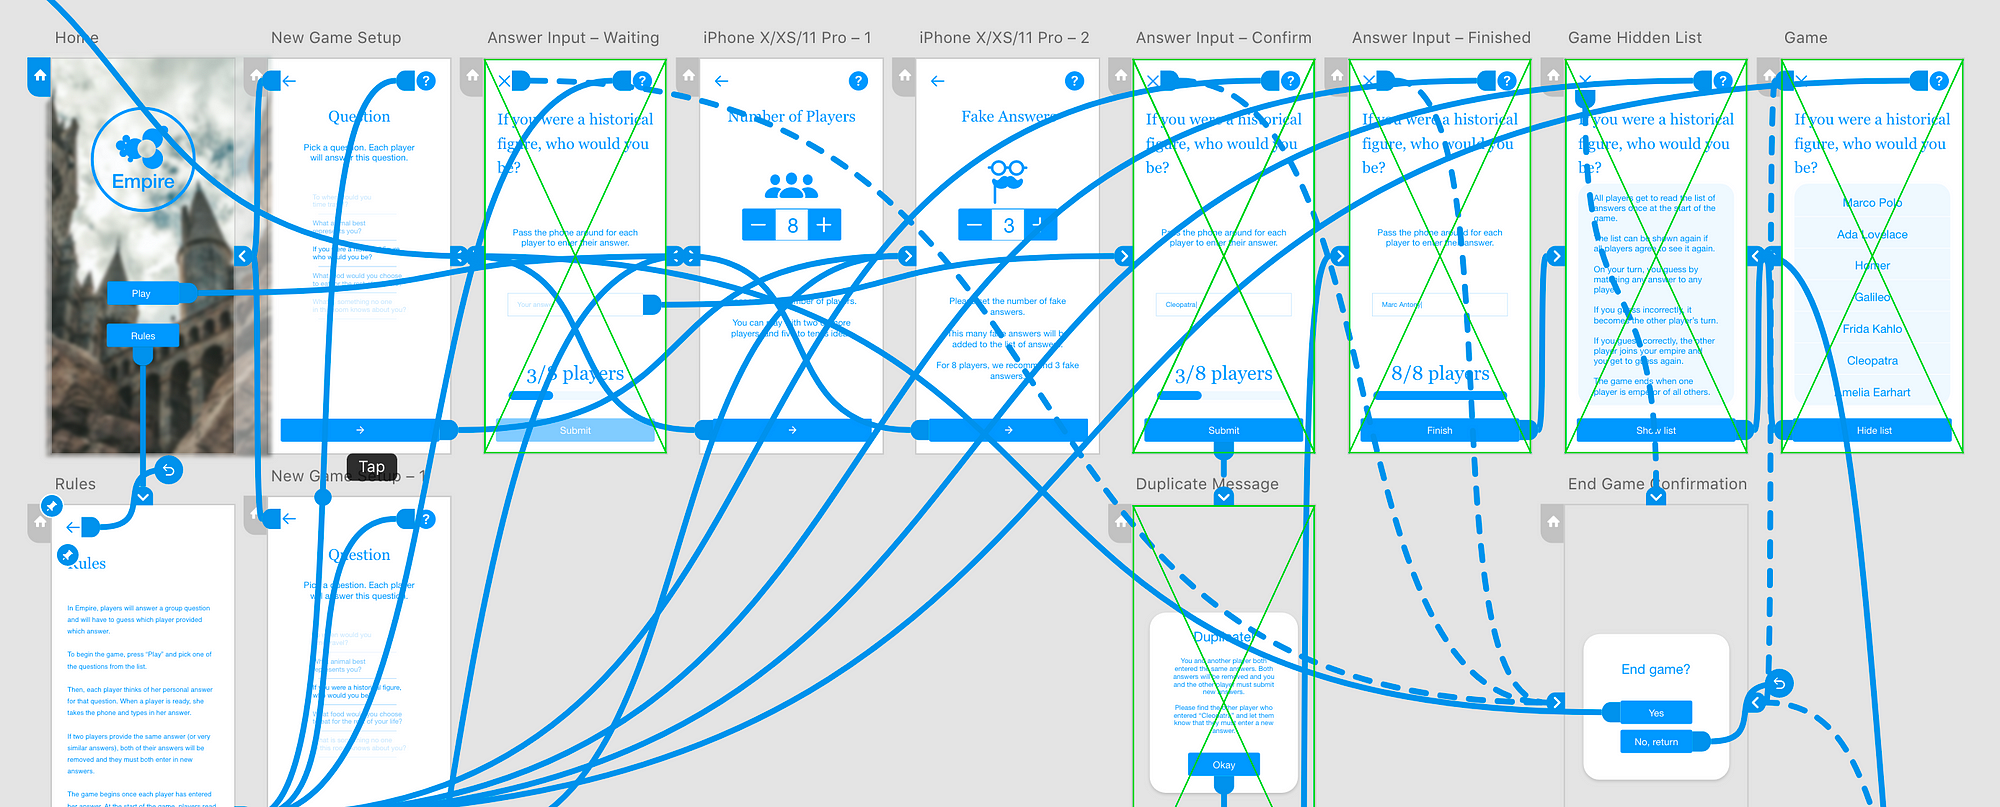
Use the design tool of your choice to create the visuals in your app and to define which buttons lead to which pages. Most tools will also let you preview this navigation as if you’re using the app (without any functionality more complex than navigation) which can help you catch bad user experiences.
Once you have the features spec’d out and the visuals and navigation designed, you should be able to move through the code very quickly.
Code
The meat of it all: moving from a design to an app.
Choosing a framework
If you want to write code that can run on both Android and iOS, you’ll want to choose a framework that allows you to do just that. Flutter and React Native are your two main choices (as of writing); read about them here. Flutter is developed by Google and is built on top of the programming language Dart (also built by Google). React Native is developed by Facebook and built on top of JavaScript. I chose React Native, in part because JavaScript is very ubiquitous and Dart hasn’t taken so well.

While these frameworks make creating cross-platform apps very easy, it gets even simpler. Expo is an interface that takes care of a lot of headaches that come with setting up React Native projects. As this article puts it:
Yes, you should start your React Native project with Expo … Because frankly, there is very little reason not to … Starting a project without Expo is complicating things for no benefits at all.
There are some situations in which you will not be able to use Expo, and if you run into these situations you can easily eject your Expo app into a standard native app. So there’s no reason not to start with Expo.
Let’s dive into the steps you should take to make a React Native app via Expo.
Hello Expo
It could not be easier to get a Hello World app built with Expo. Expo includes commands that produce an app that can run on an iOS or Android simulator on your computer or directly (and wirelessly) on your phone, either of which will update in realtime as you save changes to the code.
Simply follow the clear instructions in this getting started guide.

After you run expo init your_project_name, you will be presented with a few options. Choose one of the “managed workflow” options, as “bare workflow” means you will not be using Expo. I chose to start with a blank app but you should consider tabs as well.
Hello Navigation
If you chose to start with a blank app but need to add page navigation to it, follow the directions for React Navigation. Strangely, I ran into some issues with the examples on that page. Following this third party tutorial helped me fix things.
Building the app
All that’s left is to build what’s in your design. For me, this meant creating pages for each page in my design and populating the pages with the appropriate React Native components. The Expo documentation also has plenty of helpful resources (e.g. create a button, add a splash screen, etc).
Adding analytics
I wanted to know when people were using my app and how long they were spending on each screen.
There are many analytics tools out there that can be added to mobile apps to collect user data, at least two of which play nicely with Expo apps. These are Firebase and Amplitude. You can also use Sentry or Bugsnag specifically for tracking crashes and exceptions.
Note: expo-analytics is a popular option but relies on Google Analytics, which is being phased out by Google. You should avoid this option.

I chose to use Amplitude, which I found was easy to add to my Expo app and had a nice console for investigating user actions.
Publishing
Now that you’ve got a working app, it’s that very exciting time in which you get to share your hard work with the world.
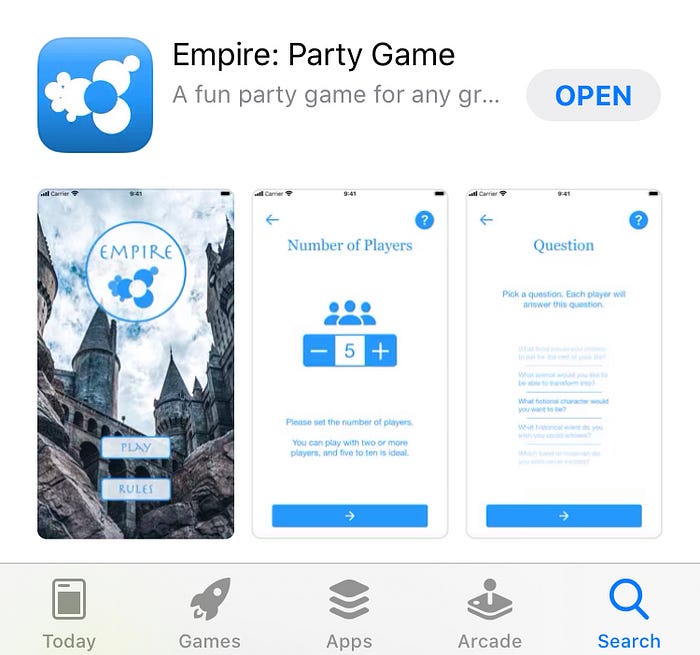
You need to first build your app so that you have a final binary that can be published. Follow Expo’s documentation on building your app.
Once you’ve built the binary, follow Expo’s documentation for uploading apps to the Apple App Store and Google Play.
Filling out all the information for the App Store and Google Play can be tedious and daunting the first time through, but both platforms do give you step by step instructions that are easy enough to follow.
The good news is that, after you’ve published your app for the first time, Expo makes it extraordinarily easy to publish changes. I need only run two commands (expo build:ios and expo upload:ios) and after a short wait, my phone pops up with an updated version of my app (via Testflight, in this case).
Congratulations! That’s all it takes to make an app. Thanks for reading, and I hope this was helpful.
Resources
On writing specs
On design tools
On coding and publishing
- React Native Documentation: Learn the Basics
- React Native Documentation: Components and APIs
- React Native Documentation: Navigating Between Screens
- Expo Documentation: Ejecting to ExpoKit
- Expo Documentation: Using Firebase
- Expo Documentation: Using Amplitude
- Expo Documentation: Using Sentry
- Expo Documentation: Using Bugsnag
- Expo Documentation: Building Standalone Apps
- Expo Documentation: Uploading Apps to the Apple App Store and Google Play
Third-party resources
“Uncommon thinkers reuse what common thinkers refuse.”
— J. R. D. Tata
Check out Bit.dev, a cloud component hub. Use it to publish JS components, document and organize them in the cloud.
It’s a great way to maximize code reuse, speed up development and collaborate on components across repositories.