How to Create and Publish NPM Packages
Effortlessly Manage and Publish Your npm Packages with Bit

When we package and publish software, we make it portable and abstract. The published package can be reused across projects. It has a separate and easily traceable version history, offers a well-defined interface (with the implementation “hidden away”), and integrates into your project as one node in a clear dependency graph.
Transforming software into separate packages doesn’t just promote code reuse — it enhances your codebase’s overall maintainability.
So, package away as much as you can 💪
The basic workflow
1. Initialize a Bit workspace
Install Bit:
npx @teambit/bvm installInitialize a new workspace in an empty directory or an existing project.
Replace BIT_ACCOUNT.SCOPE_NAME with your Bit Platform account/organization and scope name.
cd my-project
bit init --default-scope BIT_ACCOUNT.SCOPE_NAME
2. Track files to be published
Our project contains a module/component named foo .
├── foo
    ├── foo.ts
    └── index.ts // the index files serves as the package "main" file
To track it as a Bit component, we’ll point to the foo directory, which contains all its source files:
bit add fooThe output should confirm the component was added successfully:

Let’s compile our module’s code:
bit compileAnd validate it is ready to be packaged:
bit status
The tracked module/component is already available locally as a package:
my-project
  └── node_modules
      └── @my-account
         └── my-scope.foo
3. Build and push
Run the following to build your Bit component and generate a package:
bit tag
bit export
By default, packages are published to Bit Platform’s package registry. They can be installed from any machine (with or without Bit installed) by configuring the .npmrc file accordingly.
Alternatively, you can configure your Bit workspace to publish to NPM’s registry or any other registry of your choice:
/**
* @filename: workspace.jsonc
*/

{
  "teambit.workspace/variants": {
    "*": {
      "teambit.pkg/pkg": {
        "packageManagerPublishArgs": ["--access=public"],
        "packageJson": {
          "private": false,
          /** construct the package name using the "{name"}
            * and "{scope}" placeholders
            */
          "name": "@my-npm-scope/{name}"
        }
      }
    }
  }
}
See the official docs to learn more about publishing Bit components to third-party registries.
Publishing multiple packages with dependencies
Our project contains two modules: foo and boo . Our boo component is dependent on foo :
/**
 * @filename: boo.ts
*/

import { foo } from '../foo/foo.ts';

// ...
Let’s see how both modules can be packaged and published.
bit add foo
bit add boo
bit compileWe’ll then verify both our modules are ready to be isolated from their host project:
bit status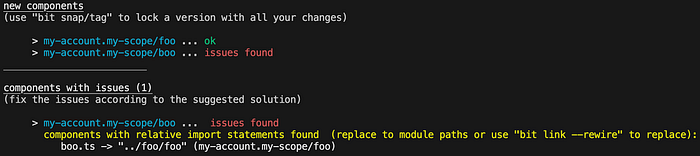
Bit auto-detects your module’s dependencies. When the package is generated, these dependencies are included (by Bit) in its package.json .
However, if a module has a relative ‘import’/’require’ to some file in its host project, it cannot function as an isolated package.
In this case, Bit offers to replace those relative paths with absolute ones corresponding to the package. This is not always an option, but in our case, since the relative path is to foo and foo is already being prepared to be packaged, then the relative path can be replaced with foo ‘s package name:
bit link --rewireIn the boo source file we can see the relative path was replaced by the absolute package name:

We can look into the module’s metadata, such as its dependency graph, by running:
bit show booNote how the output lists foo as a dependency:

You can also run Bit’s dev server and UI to inspect your components visually:
bit start
To publish both modules, we’ll run:
bit tag
bit export