Securely Upload Files Directly from Browser to Amazon S3
I think you’ll agree with me if I say file uploading is a common feature in web apps. Users upload their profile photos, documents, or even sensitive data like medical records, payslips in different web apps.
Well, as developers, how far do we think of the different access control techniques for file uploads? And what are the methods available for us?

Let’s take an example of someone uploading a profile picture. After uploading the image, who else can see it? Can anyone else modify it? Are these operations considered a security breach in your application context? We need to ask these questions and take measures to protect user data at all costs.
In this article, I will share a simple but powerful way to securely upload files directly from your frontend to Amazon S3 using the AWS Amplify JavaScript library.
I will start by discussing how to upload the files and use the three file access levels to protect user uploads with relevant code snippets. Then we’ll learn how to generate temporary file download URLs to read the files. Finally, we’ll create a secure file uploading component using React.
When you’re done building your React aws-file-upload component, you can use Bit (Github) to publish it to Bit’s component hub and reuse it across your apps.
Learn more about it here:
Upload Files Directly from the Frontend
Before discussing the rest of the process, we should understand how Amazon S3 knows who is uploading the files?. For this purpose, we use the Amazon Identity Provider service named Cognito User Pool. I will discuss this in detail at the end of the article.
First, let’s have a look at how we can upload files from the browser. For this, we use AWS Amplify JS by using its Storage.put method.
Currently, AWS Amplify JS supports three predefined file access levels to read the file after uploading it from a frontend. Those are Public, Protected, and Private. Let’s look at how we combine it with the uploading of the file.
1. Public
As the name implies, the files uploaded with the public access level are accessible to all the users of your application.
2. Protected
If you associate the protected access level with a file, all of your application users can read it. Still, only the creating user can update the file.
3. Private
The private access level ensures a file is only accessible to the user who created it.
Once the upload is successful, you can view the files in the Amazon S3 bucket. These file uploads are available in the corresponding folder. i.e., public, protected, or private.
Read the Uploaded Files from the Frontend
In the above section, we discussed how to use Amplify Storage to upload files into S3 securely. We can also use Amplify Storage to create temporary download links with expiration times for secure download.
Have a look at the following code. We only have to pass the expiration time of the download URL. That’s very easy!
Build an Image Uploader Component with React
Let’s use the above code snippets step by step to build a complete React file uploader component. However, you can use Angular, Vue, or any other JavaScript framework since the API calls are not React specific.
Step 01
Let’s use create-react-app to create a React app fast.
npx create-react-app my-appcd my-app
Step 02
Install Amplify CLI globally. We use Amplify CLI to provision resources in AWS
npm i -g @aws-amplify/cliStep 03
Configure your AWS user with Amplify.
amplify configureStep 04
Initialize an amplify project inside the react app. During the initialize process, amplify creates the project in AWS to keep track of the project resources.
amplify init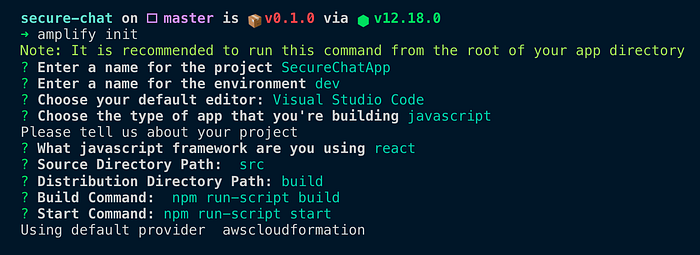
Step 05
Create a User Pool with Amplify CLI so our users can log in to the application, and they will be assigned temporary permission once they logged in.
amplify add auth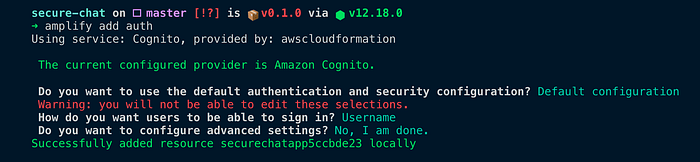
Step 06
Create an S3 bucket to store the public, protected, and private files. Remember to add a unique name for the S3 bucket.
amplify add storage
Finally, push the configuration to AWS. It’ll create the S3 bucket, UserPool, and other resources in your AWS Account.
amplify pushStep 07
Install the Amplify UI component library for React so that we can use the pre-built Login component in the application.
npm i @aws-amplify/ui-reactStep 08
Copy the following code into the App.js file. Firstly import Amplify and Storagemodule from aws-amplify. Then we configure the AWS resources (S3 bucket and the User pool) with Amplify.
The rest of the code is related to file upload/download functionality. We create an event handler function handleChange to trigger as soon as a file is selected. Let’s use the “private” file access level so that the uploader can only view/delete the image. Here we use the downloadUrl function to create a temporary download URL of the uploaded image.
You can find the sample code in this Github repository.
What’s Happening Under the Hood?
User Identity Recognition with AWS Cognito
AWS recommends using Cognito User Pool to store users for web or mobile applications. Once we have a user pool attached to our app, the user authenticates against the Cognito User Pool (At login). If the authentication is successful, Cognito assigns temporary permission to the logged-in user to access AWS resources.
When we add Amplify Storage Category to our application, it updates these permissions. For example, An authenticated user has permission to create/read/edit files in public, protected, or private folders inside the S3 bucket. In contrast, an unauthenticated user has permission to create/read/update files only in the public folder.
Understanding Amplify Storage
AWS Amplify provides a CLI and a library to quickly provision resources on AWS and interacts with them. It has a particular category to work with Amazon S3 service. That’s called Amplify Storage, and we can use it to upload files securely to Amazon S3 directly from the browser.
In a nutshell, We use Amplify CLI to create an S3 bucket in AWS. Then we use Amplify Storage to upload files into that bucket using public, protected, or private file access levels. Finally, the files get uploaded into the corresponding public, protected, or private folder inside that S3 bucket.
We saw some code examples on how to use the AWS Amplify library to upload and download files from S3. Let’s understand what’s happening behind the scenes.
Fine-Grain Access Permission to Files
Developing a fine-grain permission model for S3 uploads is not a trivial task. We need to add user authentication information to HTTP requests made from frontend to AWS. We need to sign these requests with security credentials (The Access key ID and Secret Access Key) and temporarily assign them to a logged-in user.
Sounds complicated, right? As you see in the code examples, Amplify JS Library handles all of these complexities for us. It automatically grabs the security credentials of the logged-in user and signs the HTTP requests to AWS.
I hope you understood the basics of file uploading to Amazon S3 directly from the browser. You just reached the end of the article. Thanks for reading. If you have any questions, feel free to comment below.