VueJS and Serverless: The Right Combination for a Realtime Chat App
Over the past few years, Serverless has become the fastest-growing cloud service model. Almost all cloud vendors have Serverless offerings that support a wide range of use cases, including APIs, RealTime Messaging, Data Processing, Dev Ops, etc.
Similarly, VueJS has become one of the leading frontend frameworks as of now. While writing this article, I was quite surprised to see that VueJS has more Github stars than Angular or React.

In this article, I’ll show you how easy it is to build a real-time chat application using VueJS at the frontend and a GraphQL API deployed on AWS AppSync at the backend. I’ll be using AWS Amplify to speed up the implementation.
Amplify is a full-stack application building framework that reduces a lot of pain developing and deploying Serverless applications on the AWS cloud.
Also watch:
Solution overview
The diagram below shows the architecture of the solution we are going to build.
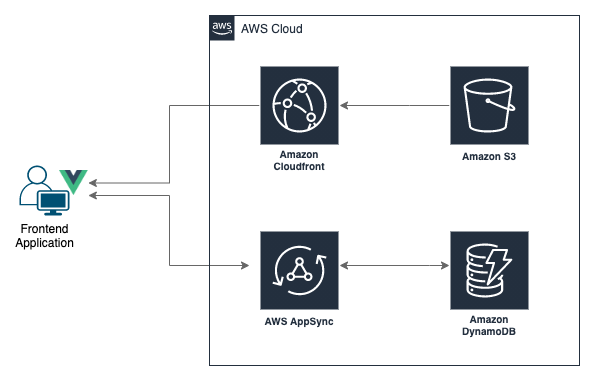
As you can see, the backend functionality is handled within the AppSync service, where we don’t need any coding for the functionality apart from defining the GraphQL schema.
Basically, this application has the following functionality,
- Join new users to the chat and show them to others in real-time
- Send messages to all users in real-time
- Receive messages from all users in real-time
Here, we are using VueJS for building the frontend together with the Quasar UI Framework since it has pre-built UI components for building chat interfaces easily.
1. Creating the frontend
To begin with, install the Vue CLI tools using yarn global add @vue/cli and create the Vue application using vue create realtimeapp command.
Next, you have to install Quasar. And, there are multiple ways to do it. Here, we are using the Vue CLI Quasar Plugin method.
cd realtimeapp
vue add quasar
During the plugin installation, make sure you allow replacing the App.vue file with Quasar’s version. After the installation, we can run the application and see the changes.
yarn serveNow that we have installed the UI framework let’s build the chat interface. For it, use the default layout generated by Quasar, which has a side panel on the left and a page container on the right. To keep the code clean, we can decompose the UI into multiple components as follows.
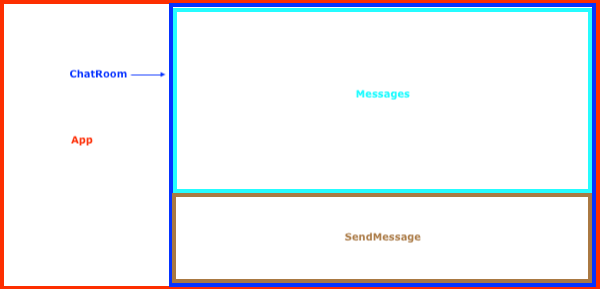
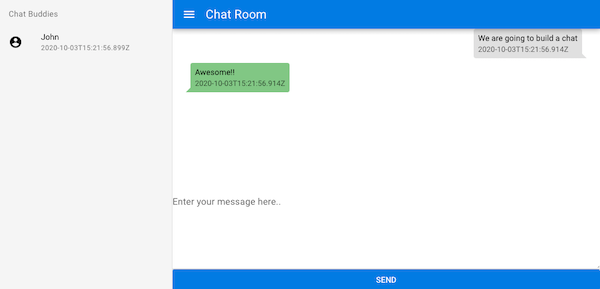
You can use the Quasar UI widgets to fast track the components' implementation. Then, the final UI would look like the one given below. Refer to the sources at the end of the article for complete source codes of each component.
This is sufficient for the moment to set up the Amplify project.
2. Creating the backend
First, you have to install and configure Amplify CLI. Refer to the Amplify Documentation for more details.
Once you have set up the CLI, you can initialize the amplify application by running the command amplify init.
Make sure you run the above command from the root of the project (in this case realtimeapp).
These are the app configurations I have used.
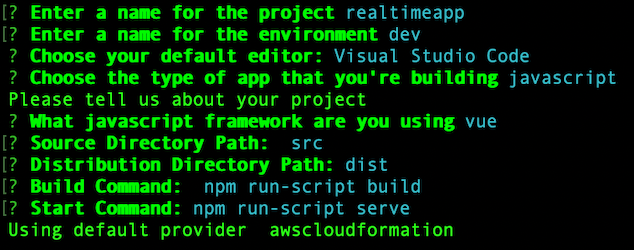
Next, you have to create the GraphQL API which is the heart of this application.
Creating the GraphQL API
You can create a GraphQL API by running the command amplify add api and selecting the service as GraphQL. Here are the API configurations you will use for it.

This is the GraphQL schema. The types annotated with @model would create tables on your database. You would use DynamoDB as your database since it’s natively supported within AppSync.
Now, let’s provision the GraphQL API in the AWS cloud.
amplify pushThe above command prompts to generate the client code (this connects the frontend with the GraphQL API). Select Yes and use the default values for the subsequent prompts. In the end, you would get the endpoint URL and the API key printed like below.

Now, your backend is live, and you can integrate it with the frontend.
3. Integrating Backend to the Frontend
So far, we have seen that Amplify has already generated the client code to consume your GraphQL API inside the frontend application. The default directory of the generated files is src -> graphql. Let me quickly explain what these files are and what their purpose is.
GraphQL Client Code Files
- mutations.js — The functions required to create/update/delete database objects
- queries.js — The functions required to get database objects
- subscriptions.js — The functions required to watch database object changes
- schema.json — The schema of our database
Okay, now let’s see how you can use these files within your application. But before that, you need to configure amplify within your frontend application.
Configure Amplify
First, you have to install the amplify module with yarn add aws-amplify and configure it at the starting of the Vue application. For this, add the following lines after the last import src -> main.js file.
import Amplify from 'aws-amplify';
import aws_exports from './aws-exports';

Amplify.configure(aws_exports);
Integrate GraphQL API
Next, you can import the above files to your Vue components to handle the required operations. Anyways before moving into the source codes, have a look at the functionality of your components.
- App.vue — Load the existing users' list and subscribe to receive new users and update the UI accordingly.
- Messages.vue — Load the existing messages list and subscribe to receive new messages and update the UI accordingly.
- SendMessage.vue — Create a new message using the text entered.
- ChatRoom.vue — Create a new user using the name entered and mount the Messages and SendMessage components on the UI.
You can better understand this from the source codes given below.
App Component
Messages Component
SendMessage Component
ChatRoom Component
4. Hosting the Frontend
Okay, you are ready to go live now. You can host it on the AWS cloud using S3 and Cloudfront (or using S3 only) by running the commands below.
amplify add hosting
amplify publish
You will feel relaxed as you please because the publish command would build the Vue application and then host it. So you don’t have to run the yarn build manually.
Wooh! Now you have a 100% Serverless real-time application that integrates with a third-party service for mediating messages.
Conclusion
Using Serverless services like AWS AppSync takes out quite a lot of pain for running GraphQL APIs in the cloud. And together with AWS Amplify, it is even more comfortable and faster to develop and deploy full-stack applications on the AWS cloud.
On the other hand, Vue is trending in the developer communities because it’s a relatively simple learning curve.
With this combination, we can build a highly scalable chat application with the least amount of effort.


